lunes, 19 de diciembre de 2016

Esferas de Emojis Navideños

Emoji Christmas Ornaments

Hola chic@s Cómo están? Hoy les traigo este proyecto fácil y rapidito de hacer con los peques de la casa o si eres principiante y no cuentas con mucho material, este proyecto es perfecto para ti.

Hi, how are you? Today I bring you this project easy and quick to do with the children of the house or if you are a beginner and you do not have much material, this project is perfect for you.

Son unas Esferas de Emojis, muy lindos y tiernos para decorar el árbol de Navidad. Yo sólo hice tres pero puedes hacer mas con diferentes diseños.

They are spheres of Emojis, very cute and nice to decorate the Christmas tree. I only did three but you can do more with different designs.


Lo único que necesitamos de base es cartulina amarilla, roja y blanca. Un hilo, cordón o listón. Pluma negra o café. Lápiz, adhesivo, tijeras, algo para dibujar los círculos. Opcional: cartón, rubor o tinta rosa.

All we need is yellow, red and white cardboard. A thread, baker twine or ribbon. Black or brown pen. Pencil, sticker, scissors, something to draw circles. Optional: cardboard, blush or pink ink.


Busqué los Emojis en google para ir copiando las caritas y las chapitas se las puse a todos con tinta distress porque no tengo rubor.

I searched the Emojis in google to copy the faces and added a little bit of pink distress ink because I don't have blush.


Me gustó como quedó mi pinito con los Emojis navideños. Super fáciles de hacer para complementar la decoración de mi árbol de Navidad.

I liked how my little pine looks with the Emojis. Super easy to make to complement the decoration of my Christmas tree.


Así es como luce mi pinito ya con las tres esferas de Emojis. Me encantó, se ve tierno y divertido.

This is how my Christmas tree looks with the three spheres of Emoji. I loved it, it looks cute and fun.


Aquí puedes ver el paso a paso

Here is the step by step video


Espero que te haya gustado y sobre todo que te sirva de inspiración. Por favor, no olvides dejarme un comentario; así sabré si te gustó y es motivante para continuar haciendo esto que me gusta.

I hope you enjoyed it and especially got inspire. Please do not forget to leave me a comment; so I know if you liked it and is a motivation to continue doing this.


*** YouTube *** Facebook *** Instagram *** Pinterest *** Twitter ***


Muchísimas gracias por haberme acompañado el día de hoy. Hasta la próxima =D

Thank you for joining me today. Until next time =D


sábado, 17 de diciembre de 2016

Pocket Letter Navideño

Pocket Letter for Christmas


Hola! Cómo están? El día de hoy les traigo esta idea de Pocket Letter para Navidad hecha con materiales que se pueden conseguir facilmente.

Hello! How are you? Today I bring you this idea of Pocket Letter for Christmas made with materials that can be easily obtained.


Las tarjetitas que van en los bolsillos están decoradas con papel de regalo y calcomanías que encontré en la tienda de todo a un dollar.

The little cards that go in the pockets are decorated with gift wrap and stickers that I found at the dollar store.


Para complementar la decoración utilicé lentejuelas, perlitas, diamantitos, papel diamantado y metálico.

To complement the decoration I used sequins, pearls, ringstones, glitter and metallic paper.


En la parte de atrás, en los bolsillos, se colocan pequeños regalos como calcomanías, recortables, piezas de madera, tarjetas y por supuesto la cartita o dedicatoria.

On the back, in the pockets, you can put small gifts as stickers, diecuts, pieces of wood, cards and of course the letter or dedication.


Envolví el Pockett Letter con papel de regalo y cerre con twine. Le hice un tag para decorar la envoltura.

I wrapped the Pocket Letter with gift wrap and closed it with twine. I made a tag to decorate the wrapper.


El Pockett Letter cabe perfectamente en un sobre tamaño oficio para que pueda ser enviado por correo postal de intercambio.

The Pockett Letter fits perfectly in an office envelope so it can be sent by postal mail to your pal.


Espero que te haya gustado y sobre todo que te sirva de inspiración. Por favor, no olvides dejarme un comentario; así sabré si te gustó y es motivante para continuar haciendo esto que me gusta.

I hope you enjoyed it and especially got inspire. Please do not forget to leave me a comment; so I know if you liked it and is a motivation to continue doing this.


*** YouTube *** Facebook *** Instagram *** Pinterest *** Twitter ***


Muchísimas gracias por haberme acompañado el día de hoy. Hasta la próxima =D

Thank you for joining me today. Until next time =D

jueves, 15 de diciembre de 2016

Christmas Cards

4 Tarjetas Navideñas


Hola! Cómo están? Hoy les traigo estas 4 ideas de Tarjetas Navideñas super fáciles hechas a mano para regalar en Navidad.

Hello! How are you? Today I show you these 4 handmade Christmas Cards ideas super easy to give at Christmas.


Para la primer tarjeta opté por un panel embosado de bolitas para simular nieve cayendo y como centro focal puse un mono de nieve.

For the first card I opted for an embossed panel of dots to simulate falling snow and as focal point I put a snowman.


Le agregué un pedazo de cartulina para simular una montañita de nieve donde colocar al mono de nieve. Para enmarcar la frase utilicé un banderín de papel con glitter.

I added a piece of cardboard to simulate a little mountain of snow where to place the snowman. To frame the phrase I used a banner with glitter.


La segunda tarjeta es mas sencilla. Un panel en color craft, un transferible de monos de nieve y unos stickers.

The second card is simpler. Just a panel in color kraft, a rubbon of snowmen and some stickers.


Para simular la nieve utilicé una pluma en gel blanca.

To simulate the snow I used a white gel pen.


En la tercer tarjeta usé retazos de papel de scrapbook y tiras de papel con glitter para enmarcar el centro focal.

On the third card I used scraps of scrapbook paper and strips of paper with glitter to frame the focal point.


La palabra esta pegada con foam adhesivo y agregué unos enamel dots para complementar la decoración.

The word is glued with foam adhesive and I added enamel dots to complement the decoration.


Para la cuarta tarjeta utilicé, en su mayoría, stickers. Una tarjeta muy sencilla con pocos elementos.

For the fourth card I used, mostly, stickers. A very simple card with few elements.


En la parte de abajo sólo agregué tiras de papel metálico y con glitter. Para tapar la perforación del papel con glitter le pegué moñito hecho con twine.

At the bottom I just added strips of metallic and glitter paper. To cover the perforation of the paper with glitter I glued a bow made with twine.


Aquí les dejo el paso a paso de estas cuatro tarjetas

Here is the step by step of these four cards


Espero que te haya gustado y sobre todo que te sirva de inspiración. Por favor, no olvides dejarme un comentario; así sabré si te gustó y es motivante para continuar haciendo esto que me gusta.

I hope you enjoyed it and especially got inspire. Please do not forget to leave me a comment; so I know if you liked it and is a motivation to continue doing this.


*** YouTube *** Facebook *** Instagram *** Pinterest *** Twitter ***


Muchísimas gracias por haberme acompañado el día de hoy. Hasta la próxima =D

Thank you for joining me today. Until next time =D

viernes, 9 de diciembre de 2016

Sobre Para Tarjetas 3D

Envelope for 3D Cards

Hola! Qué tal? Hace días una compañerita seguidora me preguntó si en los sobres comunes se pueden poner las tarjetas que tienen elementos con volumen o 3D

Hello! How are you? A few days ago a follower asked me if she can put cards with some volume or 3D in the common envelopes.


Para hacer este sobre hice pruebas con la Envelope Punch Board de We R Memory Keepers. Este sobre tiene un espacio para colocar una tarjeta con un grosor de 1/4"

To make this envelope I tested with the We R Memory Keepers Envelope Punch Board. This envelope has a space to place a card with a thickness of 1/4 "


Para decorarlo le pegué unas tiras de papel de scrapbook.

To decorate, I glued some strips of scrapbook paper.


Aquí te dejo el video del proceso

Here is the video of the process


Espero que te haya gustado y sobre todo que te sirva de inspiración. Por favor, no olvides dejarme un comentario; así sabré si te gustó y es motivante para continuar haciendo esto que me gusta.

I hope you enjoyed it and especially got inspire. Please do not forget to leave me a comment; so I know if you liked it and is a motivation to continue doing this.


*** YouTube *** Facebook *** Instagram *** Pinterest *** Twitter ***


Muchísimas gracias por haberme acompañado el día de hoy. Hasta la próxima =D

Thank you for joining me today. Until next time =D

miércoles, 7 de diciembre de 2016

Christmas mini flipbook

Mini Flipbook con Sobres para Navidad

Mini Flipbook with envelopes for Christmas

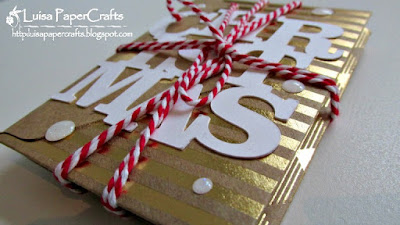
Hola! cómo están? El día de hoy les traigo una idea rápida y fácil para regalar en Navidad. Es un flipbook hecho con pequeños sobres.

Hello! how are you? Today I show you a quick and easy idea to give away at Christmas. It's a flipbook made with small envelopes.


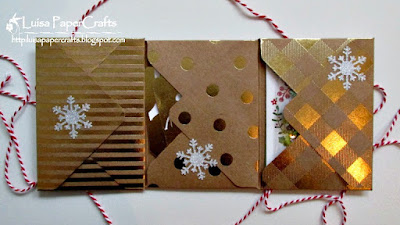
Para hacer los sobres utilicé la Envelope Punch Board de We R Memory Keepers y papel de Scrapbook con diseños dorados de 6" por 6".

To make the envelopes I used the We R Memory Keepers Envelope Punch Board and 6 "by 6" Gold Scrapbook Paper.


Sólo hice 3 sobres y en cada uno le metí regalitos. En el primer sobre puse la cartita, en el segundo metí unos mini tags que hice con otra de las hojas del pad y le pegué unos cortes de la Silhoutte Cameo y en el tercer sobresito van unas tarjetas de project life navideñas y una bolsita de lentejuelas.

I only made 3 envelopes and in each one I put small gifts. In the first envelope I put a little card, in the second I inserted some mini tags that I made with another one of the sheets of the pad and stick few cuts of the Silhoutte Cameo on them and in the third envelop I put holiday project life cards and a bag of sequins.


Sólo decoré con unos copos de nieve porque ya el papel es demasido vistoso y no quise taparlo y opacarlo.

I only decorated with few snowflakes because the paper is already too colorful and I did not want to cover it and dull it.


Para cerrar el mini flipbook utilicé un baker twine con colores navideños, corté un pedazo largo de twine para que la persona que lo reciba lo pueda utilizar para diferentes proyectos.

To close the mini flipbook I used a baker twine with Christmas colors, I cut a long piece of twine so that the person who receives it can use it for different projects.


Puedes ver el tutorial en este video

You can see the tutorial in this video


Espero que te haya gustado y sobre todo que te sirva de inspiración. Por favor, no olvides dejarme un comentario; así sabré si te gustó y es motivante para continuar haciendo esto que me gusta.

I hope you enjoyed it and especially got inspire. Please do not forget to leave me a comment; so I know if you liked it and is a motivation to continue doing this.


*** YouTube *** Facebook *** Instagram *** Pinterest *** Twitter ***


Muchísimas gracias por haberme acompañado el día de hoy. Hasta la próxima =D

Thank you for joining me today. Until next time =D

jueves, 1 de diciembre de 2016

Christmas Card

Hola! Cómo están? El día de hoy les traigo esta tarjeta para Navidad muy fácil y sencilla con poco material para que todos puedan hacer tarjetas así de bonitas.

Hello! How are you? Today I want to show you this Christmas card, very easy and simple to do with little material so everyone can make cards as beautiful as this one.


Se podría decir que es una tarjeta 3D porque tiene elementos resaltados, como es el caso del pino, la muñequita Marie (Garabattas) y dos de los regalitos. Estos elementos los pegué con foam adhesivo para agregarle esa dimensión que una tarjeta 3D necesita.

It is a 3D card because it has highlighted elements like the pine tree, the doll Marie (Garabattas) and two of the gifts. I glued these elements with foam adhesive to add that dimension that a 3D card needs.


En el interior le puse otro pinito con esferitas.

I put another pine tree inside the card.


Practicamente todos los elementos son hechos a mano con excepcion del sello Marie de Garabattas. Terminé a decoración con unos stickers.

Practically all the elements are handmade with the exception of the stamp Marie by Garabattas. I finished decorating with some stickers.


Aquí está el video del paso a paso

Here It is the step by step video


Espero que te haya gustado y sobre todo que te sirva de inspiración. Por favor, no olvides dejarme un comentario; así sabré si te gustó y es motivante para continuar haciendo esto que me gusta.

I hope you enjoyed it and especially got inspire. Please do not forget to leave me a comment; so I know if you liked it and is a motivation to continue doing this.


*** YouTube *** Facebook *** Instagram *** Pinterest *** Twitter ***


Muchísimas gracias por haberme acompañado el día de hoy. Hasta la próxima =D

Thank you for joining me today. Until next time =D

miércoles, 23 de noviembre de 2016

December Daily

Hola hola! Cómo están? Inicio mi serie de videos de Navidad con este tutorial del December Daily o Diario de Navidad.

Hello Hello! How are you? I Start my Christmas video series with this tutorial of the December Daily or Christmas Journal.


El December Daily trata de documentar tu día a día. Desde el 1ero hasta el 25 de Diciembre. Ya sea de tus compras para regalar, la comida, tus salidas, o simplemente una fotografía de ese chocolatito caliente que te tomaste cierto día, etc.

The December Daily tries to document your day to day life. From 1st to 25th of December. Whether it's your shopping gifts, food, your outings, or just a picture of that hot chocolate you took some day, etc.


Las páginas tienen un formato simple pero adecuado para poder colocar muchas fotos y etiquetas en los diferentes bolsillos.

The pages have a simple but adequate format to be able to place many photos and tags in the different pockets.


Este December Daily mide 8 pulgadas de largo por 6 de ancho y lo encuaderné con la Bind It All de Zutter y usé el aro de 3/4 de pulgada.

This December Daily measures 8 inches long by 6 inches wide and I bound it with Zutter's Bind It All and used the 3/4 inch binding wire.


Los papeles decorados que utilicé son: The Story of Christmas de Echo Park Paper, Hot Cocoa de American Crafts y Sugar Plums de Recollections.

The decorated papers I used are: The Story of Christmas by Echo Park Paper, Hot Cocoa by American Crafts and Sugar Plums by Recollections.


Aquí puedes ver el tutorial paso a paso

Here you can see the tutorial step by step


Espero que te haya gustado y sobre todo que te sirva de inspiración. Por favor, no olvides dejarme un comentario; así sabré si te gustó y es motivante para continuar haciendo esto que me gusta.

I hope you enjoyed it and especially got inspire. Please do not forget to leave me a comment; so I know if you liked it and is a motivation to continue doing this.


*** YouTube *** Facebook *** Instagram *** Pinterest *** Twitter ***


Muchísimas gracias por haberme acompañado el día de hoy. Hasta la próxima =D

Thank you for joining me today. Until next time =D

jueves, 17 de noviembre de 2016

Sobres para regalar dinero

Hola! Cómo están? Hoy toca un proyecto para Scraperas Unidas y el tema es de cumpleaños debido a que nuestra fundadora Cecy García está cumpliendo años.

Hello! How are you? Today's project is for Scraperas Unidas and the theme is birthday because our founder Cecy Garcia is celebrating her birthday.


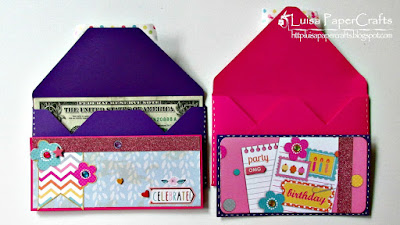
Yo decidí hacer unos sobres de diferente tamaño para regalar dinero. Uno de los sobres lo hice con la medida de un dólar y el otro con unas medidas que una seguidora me proporcionó.

I decided to make envelopes of different size to give away money. One of the envelopes I made with the measure of a dollar and the other with measures that a follower gave me.


Para sacar las medidas de los sobres utilicé la aplicación Envelope Generator de We R Memory Keeper. Esta aplicación está disponible para sistema android y ios

For the measurements of the envelopes I used the app Envelope Generator from We R Memory Keeper. This application is available for android and ios system.


También hice unas pequeñas tarjetas para cada uno de los sobres, intercalando el color de las cartulinas.

I also made small cards for each one of the envelopes, intercalate the color of the cards.


Son regalos que siempre te sacan de algún apuro. Si ya no te dio tiempo de comprar un regalo, puedes hacer un sobre y regalar dinero.

These are the kind of gifts that always get you out of trouble. If you don't have time to buy a gift, you can make an envelope and give away money.


Aquí te dejo el video del paso a paso

Here is the video of step by step


Espero que te haya gustado y sobre todo que te sirva de inspiración. Por favor, no olvides dejarme un comentario; así sabré si te gustó y es motivante para continuar haciendo esto que me gusta.

I hope you enjoyed it and especially got inspire. Please do not forget to leave me a comment; so I know if you liked it and is a motivation to continue doing this.


*** YouTube *** Facebook *** Instagram *** Pinterest *** Twitter ***


Muchísimas gracias por haberme acompañado el día de hoy. Hasta la próxima =D

Thank you for joining me today. Until next time =D


miércoles, 16 de noviembre de 2016

Mini Album Scrapbook Otoño

Hola hola! Cómo están? El día de hoy les traigo un mini álbum scrapbook para fotos sencillito de otoño.

Hello Hello! How are you? Today I share a simple scrapbook album for autumn.


El tamaño es ideal para las fotografías de 6" x 4". Este álbum tiene 4 páginas y las cuatro tienen bolsillos donde esta colocado un tag para seguir agregando mas fotografías.

The size is ideal for 6 "x 4" photos. This album has 4 pages and the four have pockets where a tag is placed to continue adding more photos.


Escogí un color kraft por el papel decorado y para que resaltará mas el tono metálico del diseño. Este pad lo compré en Target y es de 6" x 6"

I chose a kraft color the paper pad is kraft and also to highlight the metallic tone of the design. This pad I bought at Target and is 6 "x 6"


A algunas páginas les agregué un bolsillo para agregar mas etiquetas o tarjetas.

On some pages I added a pocket to add more tags or cards.


A este álbum le caben perfectamente 16 fotografías de tamaño standard. Ideal para regalar. Aquí una vista a las páginas internas.

This album can fit perfectly 16 standard size photos. This is ideal for giving as a gift. Here is a view to the internal pages.


Para encuadernar utilicé la Bind It All de Zutter con el aro de 3/4", para las tapas usé cartón prensado de 2mm de grosor y el papel kraft para forrar las tapas y hacer las páginas utilicé cardstock de Recollection de #65 lb o 176 gr

For binding, I used Zutter's Bind It All with the 3/4" ring, for the covers I used 2mm thick pressed cardboard and the kraft paper to cover the tops and to make the pages, I used the Recollection # 65 lb or 176 gr cardstock.

Puedes ver el video del paso a paso

You can see the step by step video


Espero que te haya gustado y sobre todo que te sirva de inspiración. Por favor, no olvides dejarme un comentario; así sabré si te gustó y es motivante para continuar haciendo esto que me gusta.

I hope you enjoyed it and especially got inspire. Please do not forget to leave me a comment; so I know if you liked it and is a motivation to continue doing this.


*** YouTube *** Facebook *** Instagram *** Pinterest *** Twitter ***


Muchísimas gracias por haberme acompañado el día de hoy. Hasta la próxima =D

Thank you for joining me today. Until next time =D